How to Do Lettering/Calligraphy With Crayola Markers

You want to get into calligraphy and you are on a budget and you are wondering but all of these brush pens and calligraphy pens are all to out of my budget.
Well did you know that you can do lettering or calligraphy with your Crayola Markers?
Yes, you can do lettering with Crayola Markers and I am going to show you how you can get started with this tight budget.
Here is a brief summary of what you are going to be learning today:
- Materials Crayola Lettering
- How to hold the Marker
- How to Use the Marker
- How to Practice
- A basic Technique
Materials For Crayola Lettering
So, of course, you are going to need Crayola markers. If you are going for smaller letters I would go with the Crayola super tips.
But any type of Crayola markers would be fine for this tutorial.
PAPER
Usually, if we were going to talk all about using brush pens I would be saying that paper is everything but since we are not using brush pens I am now going to say that paper isn’t everything.
There is only one thing that I would recommend when looking for paper to make sure it is bleed proof. Because even with Crayola markers they could start ripping up your paper.
But really with these markers, card stock is perfect.
How to Hold the Marker
Now you have all of your materials and we can get started. The first thing that you are going to want to learn is how to hold the marker.
You do not want to hold the marker the way you would regularly hold it. You are going to have to teach yourself to hold the marker at an angle.
If you don’t hold your marker correctly it is going to be hard to get the thin upstrokes and thick downstrokes.
You are going to want to hold your marker at a 45-degree angle. You would usually hold a regular marker, pen or pencil at around 90-degree angle.
Here are some pictures so that you could get a better take on this.


How To use the Marker
You have just learned how to actually hold the marker so that you can be able to start lettering. But now you re wondering how are you going to actually get your thin and thick strokes.
In calligraphy upstrokes are thin and down strokes are thick. So when you are doing upstrokes you are going to want to put light pressure. When you are doing downstrokes you are going to want to have a lot of pressure.
This will lead to a difference in line weight witch is exactly what you are aiming for.

Another thing you could do is whenever you are going into a downstroke you move your wrist so that you’re holding your marker at a 30 degree angle leading for you to create a downstroke.
It is just your preference.
When you are just starting out this might be hard to do but just keep practicing and you will get there.


How to Practice Lettering
Before starting to practice you should now somewhat of how to actually hold the marker and how you are supposed to use it. You have to practice the steps that I have shown above before actually starting to practice the basics of lettering.
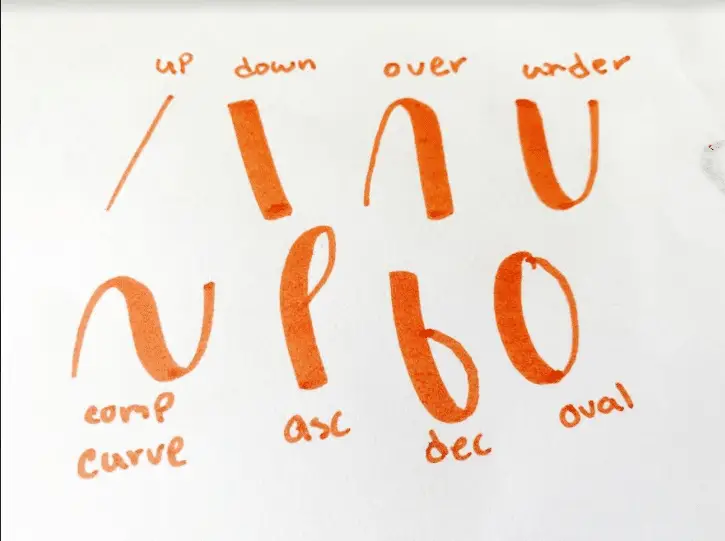
When practicing lettering as a beginner you should be practicing the basic strokes of lettering.
These are the 7 basic strokes of lettering:
- Underturn
- Overturn
- Upstroke
- Downstroke/Upstroke
- Oval
- Compound Curve
- Ascending loop/Descending loop
Here is a link where I go a little bit more on what these are and how to use them: https://ximenaletteringart.com/how-long-master-
When Practicing the basic strokes I recommend creating guidelines with a ruler.
For example, create a line with a space in the middle of 1 inch so that all of your compound curves are an inch in height. So on and so forth.
When you are practicing you are looking for consistency.
Once you are done mastering the basic lettering strokes you can start forming letters with these strokes.
Here is an example of strokes coming together to form a letter, phrase, or word.

I also wanted to include that I have found these awesome Crayola markers that are metallic on amazon. These are great if you want to get those gold glittery letters on your black paper.
Basic Technique

If ou are not comfortable being able to create these calligraphy strokes wiht an actual marker here is what you can do.
Here is the materials that you are going to need
- Plastic bag/piece of plastic
- Your Crayola Markers (or any other waterbased markers)
- Water
- Round point brush (any type of brush you could do lettering with)
FIRST
With your markers, you are going to want to start by grabbing your plastic bag and just start writing all over it with your Crayola markers.
SECOND
Take out your brush and dip it into the water and start rubbing it against your piece of plastic. You will start to notice that your brush will take up the ink.

THIRD
Take out your paper and start coloring. This is considered water brush calligraphy.
If you want to learn more about this type of calligraphy here is a link to my other article going more in-depth on how to d lettering with watercolor.
Conclusion
You have now just learned all of the basics that comes into doing lettering with your Crayola markers. You have also learned how to do lettering with a tight budget.
If you have any questions feel free to comment.