How To Use Tombow Dual Brush pens For Beginners

You have just got your new Tombow Dual Brush Pens and you have never seen these before or you haven’t really used brush pens. There is a lot of things that you should know before starting to use your Tombow Dual brush pens.
So how do you use Tombow Dual Brush Pens?
You should always be holding your brush pen at a 45-degree angle to the paper. You are also going to want to make sure that you have the correct materials to use your Tombow dual brush pens.
This was of course the short and quick answer (to those of you who are in a hurry). Do not worry because I am going to be explaining all of this for the rest of the article.
This article is just going to be a Beginners Guide to using Tombows for beginners. Here is a brief summary of what you are going to be learning about today.
- How Do You Hold a Brush Pen
- Paper that you have to use with your brush pens
- Basic Lettering Tutorial
- Simple Techniques with brush pens
- My top tips with for using Brush Pens
How do You hold a Brush Pen
There are honestly so many ways that you can be able to hold your brush pen depending on how and what you are going to be using it for.
For example, you would probably hold your brush pen differently for illustrating than for lettering.
Here I am just going to give you the basics. The more upright you hold your brush pen the more control you are going to have of your brush tip.
The closer you hold your brush pen to the paper, the less control you are going to have your brush pen.
At the same time the more upright you hold it the less line variation that you are going to get.
A lot of beginners would instantly start holding there brush pens like a regular pencil. This is unfortunately completely wrong.
The number one factor when holing your brush pen is too make sure that it is not too upright.
A lot of times when holding a pen or pencil we hold it at a 90-degree angle which is something that we don’t want to do because it will be harder to get different strokes.
This can also lead to your brush pen to fray.
Neither do we want to hold it to close to the paper.
For lettering or calligraphy, I would recommend holding it at a 45-degree angle at all times.
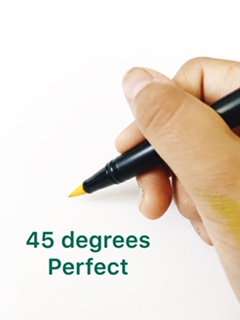
Holding at 45 degrees to your paper gives you good control of the pen and also the ability to get different line variation.
Paper For Tombow Dual Brush Pens
There have been many misconceptions when it comes to using paper for your brush pens. Some people say you can just use regular printer paper for brush lettering, but that is all wrong.
There are a couple of things that you are going to want to take into consideration when choosing the paper for your brush pens.
- It must be bleed proof
- It is smooth
- It is thick
Now if you are going to be using your brush pens for watercolor I recommend going with hotpress watercolor paper.
The reason for this is it will give your brush pens a smooth but also thick surface to work on.
Now you have probably been hearing me say a lot about the possibilities of fraying your brush pens, well paper has a lot to do with that.
If you don’t use the correct paper for doing brush lettering it is going to lead for your brush pens to fray faster.
If you have no idea what this and if you are wondering if this is happening to your brush pens check out my article all about it here.
Now let us look at some recomendations.
One of the best cheap options for brush lettering paper is the Canson XL Mixed Media Pad. The only thing I would say is that the paper just has a bit of tooth to it, but it is still great for your final projects

Now if you are wanting a full and helpful guide to choosing the right paper for calligraphy I have done a couple of articles all about it.
You can find these articles in my calligraphy supplies section.
Basic Lettering Strokes
So in this section, I am going to be sharing with you the basic lettering strokes that you must know if you are using your brush pens for brush lettering.
- Upstroke
- Downstroke
- Under Turn
- Over Turn
- Ascending Loop
- Descending Loop
- Compound Curve
- Oval
Now here is an awesome picture guides that are going to be able to help you understand these basic strokes.

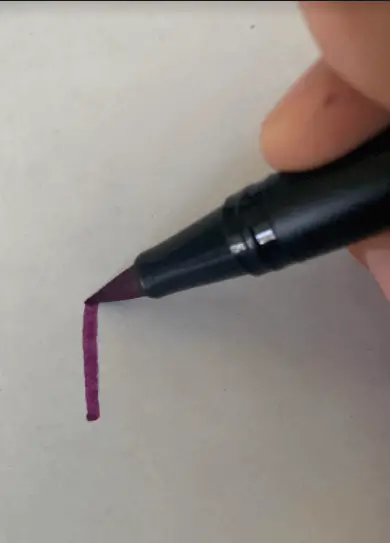
But now you may be wondering, how do we get the line variation?
Well, we get the line variation with the amount of pressure that we are putting onto our pen. So whenever we are doing our downstroke we are going to apply lots of pressure. Whenever we are doing an upstroke we are going to apply less pressure.
This then leads to our differnet strokes.
When starting out I recommend switching between the different pressures with your pen so that you can start getting the hang of it.
Once you have learned the basic strokes you can use then to form almost every letter of the lowercase alphabet.

Top Tips For Brush Pens
(These Don’t Go in any order of which I think are the best. These are just general tips that I would give to a beginner using brush pens).
- You should not be heavy-handed when using your brush pens. I am mostly referring to the people who are not using bleed proof and smooth paper with their brush pens.
If you are being really heavy-handed on rough paper you are going to end up with a frayed brush tip (which is something that you don’t want).
- There is actually a very simple way to be able to revive your brush pens by just dipping in them into water. ( This will only work with water-based pen/marker).
Here is a link to an article: How To Revive Your Brush Pens
- You actually don’t need a brush pen blender to be able to blend your markers. You could just simply just blend them with the colors that you are using (just like alcohol-based markers).
When doing this you should be using thick bleed proof paper.
- Your able to dip your brush pens in water leading for you to be able to get a watercolor effect when you’re doing lettering/ calligraphy with your brush pens.
- For this tip, you are going to need
- Water
- Brush Pens
- Piece of Plast (Plastic Bag)
- Brush/ Brush Blender
This is a very easy tip that you can use when wanting to be able to create a watercolor with your brush pens or just to get an extra cool effect.
First, you are going to want to write all over the plastic bag with your brush pens.
Then you are going to want to either dip in your brush or brush pen blender into the cup of water (depending on what you are using).
Once you have done that you are going to want to rub it against the plastic bag leading for you to be able to collect the ink from the brush pen onto your brush/blender.
From there, you can grab your paper and just start creating some awesome art. This will also work with any other waterbased marker that you have at home.
Conclusion
Now you have learned all about using Tombow dual brush pens for a beginner so that you can start out the right way.
Remember the two key points that I have made, you need to have smooth paper and hold your brush pen correctly so that your brush pens can last you a long time.
If you are struggling feel free to comment your questions or ideas.